
Preparing Line Art for Coloring
Mister Spook at 10:55PM, July 19, 2007
A step-by-step guide to cleaning up line art in Adobe Photoshop

(5 star average out of 7 votes)


Time for a handy comic tutorial from yours truly, Mister Spook. This one's a bit of a two parter. The first half consisting of preparing an inked drawing on the computer for the second half (digital coloring). In this instance, I drew up a Beholder for all you fantasy nuts out there.
Now you'll notice this version has all the bells and whistles one expects with digital coloring. Well, before we can get to that we need to scan the image and make sure the line art is ready for coloring.
Now, this all assumes that you can successfully scan your image into your computer as an image file. Typically you'll want to scan your line at in Grayscale at about 300 to 600 dpi. Most images on the web don't need detail this high, but if you ever want to print your work, make it into a poster, etc, you'll need it that high. Once you've scanned it you'll want to open it up in Adobe Photoshop. I'm working with CS2 on a Mac here, but the steps should apply to the PC as well.
So you've scanned it. Gorgeous! Or is it? If you're lazy like I was with this drawing you might still have pencil markings left on the image. If you zoom in, you'll see ugly marks like this:
We only need the inked stuff. Thankfully, the blessed spirits of technology have allowed us photoshop users to correct the problem with an easy step. First you'll want to unlock the layer you're working on. Just go to the layer box - the little one next to your main image - and double click on the layer named “Background.” Great! Now that we've unlocked it, let's adjust our contrast levels.
To access the level controls, simply click Command+L (or CTRL+L on PCs). The window pictured above should appear and you should see the table with the little arrows underneath. Just move each arrow on either side closer to the middle, just past the black shown above. This will make our black lines crisper and darker while making the gray and white areas sharper. Once you've done this, accept it then get back to the image.
Now we'll want to get out of grayscale mode. Click on the “Image” Header at the top then Select Mode > RGB Color. Now we can color crap! But wait, we're not quite ready for that. (I should probably note that there are many ways to continue from here on in and my method may not be the most streamlined, but I like the results. The best advice is to look around and try a number of different methods and see which one works for you.)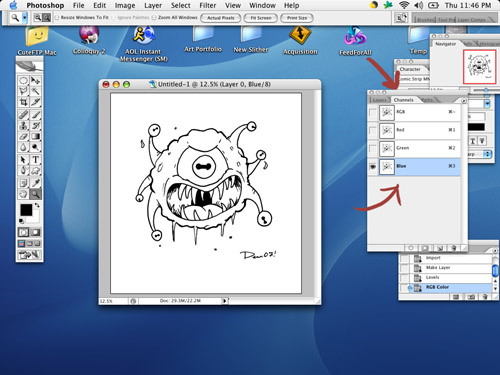
Select the channels tab on the little window next to your image then select the Blue Channel. Right click or CTRL click the channel and duplicate it. Once you have a “Blue copy” channel, select that channel then hit Command+I (CTRL+I) in order to invert the colors. You should now be looking at this.
Ye gods! Well we won't be keeping it like that for long. Click back on the “Layers” tab in that small window then go up to the “Layer” heading at “New > Layer.” The weird inverted colors should vanish and the normal picture appears. Click on the new layer that just appeared in the Window then click on Select > Load Selection. On the Channel Tab you will select “Blue copy” then accept the window. Your image should be swimming with dotted lines. This means you have selected all of the black lines of your image. Fill the selected area with the color black, either with the Bucket tool or by using the Fill command. You should be looking at this:
We're just about done. Deselect the area (make sure the swimming dots are gone) and then select the bottom layer. Fill it with a solid color either white or some other dull hue. Congratulations! You have now successfully separated your line art from your background! Save your file!
Coming Soon:
“How to Color - Spook Style”