
Creating characters for Manga Part 1
Lace at 10:46AM, Sept. 3, 2007
Learning to use stick figures as a way to pose your characters! Difficulty: Beginner


(4 star average out of 7 votes)


Creating Characters for Manga Part 1
Part 1: Using Stick figures/wire frames to pose characters
So you want to create characters for your very own manga? In this multi-part character creation tutorial, I, Lace will teach you the basics and complexities of creating your own manga characters. In part 1 of this tutorial, I will show you how to use stick figures in creating your own characters. ââ¬ÅStick figures?ââ¬Â you ask? Believe it or not, stick figures can be used in learning how to pose your characters and give them movement. Lets get started shall we?
Remember when we were children and we used to draw stick figures with crayon? Well pull out some paper and letââ¬â¢s get started! There are a couple of rules when using stick figures to draw characters. These are some rules that I have picked up over the years of experimenting with this technique. Without further ado, here are Laceââ¬â¢s rules for posing characters with stick figures!
1. Whenever I pose my characters, I always start by drawing a circle for the head. There are distinct differences between male and female characters obviously. So when drawing adult characters, male characters are 8 heads high and females are 6 ý to 7 heads tall. When drawing small to medium children they are 2-4 heads tall. The number of heads equals the height of the body. Of course decide the gender of the character before continuing on with the drawing.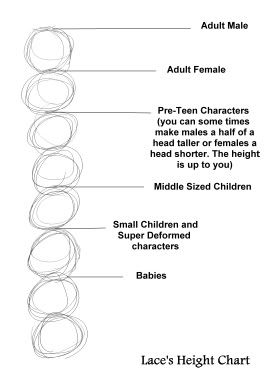
2. Draw a vertical line right down the middle from the bottom of the circle. The circle represents the head and the line down the middle represents the body. Leave some room for the neck. Under the neck you will draw a horizontal line. This represents the shoulder/collar bone area. Draw the lines for the arms. Normally, when you place your arms down by your side, the length of your arms stop right below your hips right at your thighs. I would suggest looking in a full body mirror to get an idea of that. Use a slanted line to represent the hands. Leave room for the chest and midsection. Itââ¬â¢s up to you whether or not you would like to use long waist lines or short waist lines. Posing the character next to the heads that you have stacked will give you some idea of what will give you a nice waist without severely shortening the legs. For the hips use a shorter horizontal line to represent the hip bone. Women do in fact have hips wider than their shoulder area but when drawing the stick figure, it doesnââ¬â¢t matter because fleshing in the character will create that effect. For the rest of the way, draw your legs in whatever pose you want them to be in. When adding lines for the feet, make sure they extend out from the ankle bone somewhat slanted to distinguish them from the rest of the leg. 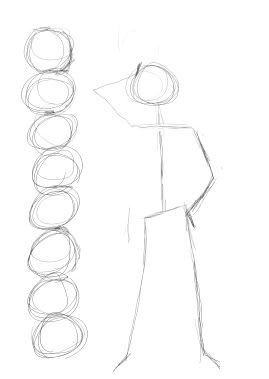
3. Use circles to represent joint areas. This always reminds me of where I can put movement in the body. Itââ¬â¢s somewhat like thinking of a machine. Just mark the areas that you know will give the body movement. These places include the shoulders, elbows, wrists, hip where the bones and legs connect, the knees and the ankle, where the leg and foot connects. The neck will move too but I never tend to place anything there. A slight sloping of the neck line will give movement when fleshing in the character. The joints in the fingers will be recognized when actually drawing the hands.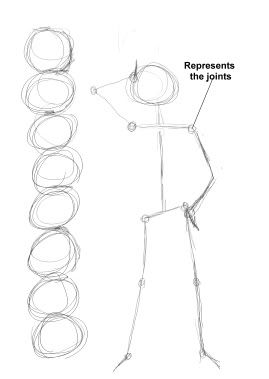
4. Try using this technique to draw different poses that you see in life and pictures online, in books, etc. With learning how to effectively use stick figures, you will be able to pose your characters in any pose that you want. The stick figure will be a guide to designing dynamic character poses, relaxed poses, virtually any pose that you want! Soon, you will be able to draw the stick figures without the guide of stacked heads. Give it a try! With practice it will become second nature to you!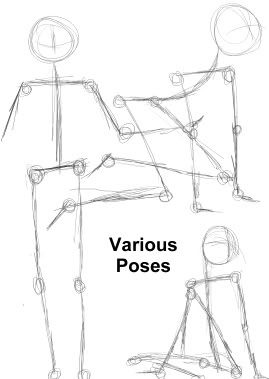
Thanks for reading my four part tutorial for using stick figures to pose your characters. I will do my next tutorial soon! Keep an eye out for part 2 of creating characters! I will explain the rules for drawing heads and adding features. I hope you have enjoyed this tutorial. See you soon!